

Task Planner | Schedule the plan
Introduction
With the period Open, each owner builds their plan: which clients they will visit and on which day. The owner can do it (with Read) or a coordinator can do it for them (with Edit). Until it is published, the plan is a draft and does not create Tasks.
Start scheduling
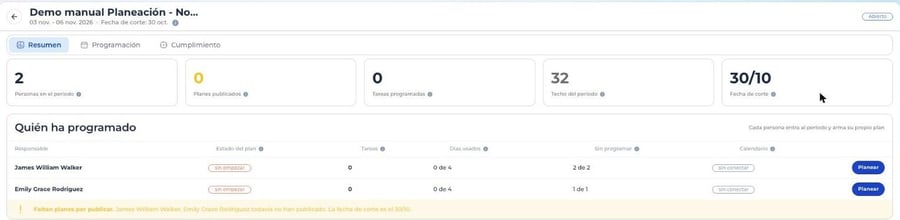
You enter the period detail with Plan: from Actions in the list, from the period panel or from each owner’s Plan button in the Summary, which opens their plan directly. The detail has three tabs:
- Summary: who has scheduled and how much.
- Scheduling: where the plan is built and published.
- Compliance: what was committed compared with what was executed.
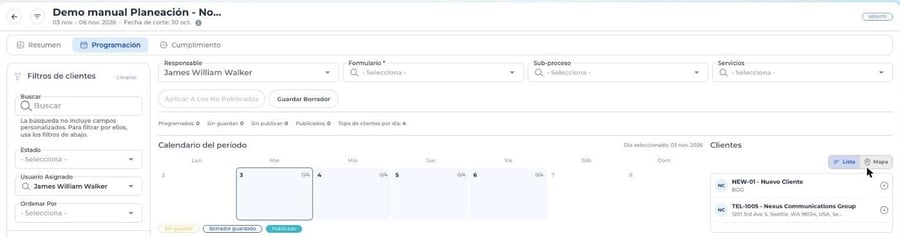
The Scheduling screen
| Area | What it contains |
|---|---|
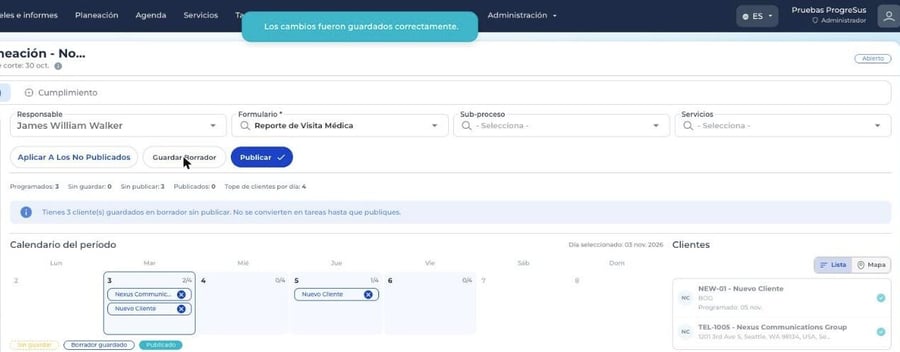
| Top bar | Owner (fixed to yourself with Read only; selectable with Edit), Form, Sub-process, Services and the buttons Apply to unpublished, Save draft and Publish (shown when there are unpublished clients). Below, the counters: Scheduled, Unsaved, Unpublished, Published and Daily client limit. |
| Client filters | Left panel: Search, Status, Assigned User (starts with the selected owner) and Order By, plus custom client fields. |
| Period calendar | The weeks of the period; days outside the range appear in gray. Each day shows its clients, the count against the limit (for example 2/4) and the owner’s agenda. |
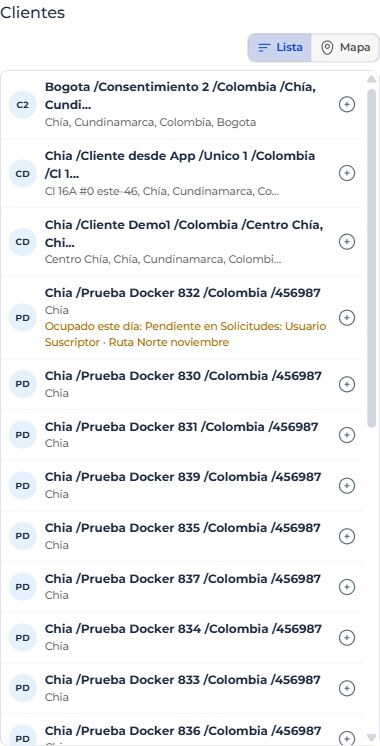
| Clients | List or Map view. Each client has a button to add it to the selected day, shows if it is already scheduled on another day and shows Busy this day when applicable. |
Plan colors: yellow is Unsaved, blue is Saved draft and green is Published.
Build the plan step by step
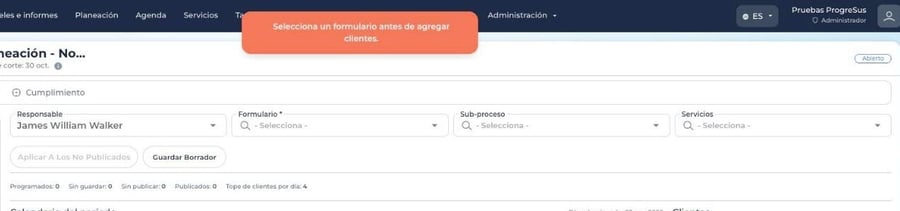
- Choose the form. It is required before adding clients. If the form has a sub-process or service set up, they are suggested automatically and you can change them.
- Select a day in the calendar. Only days within the period range can be selected.
- Add clients to the day with each client’s button in the list or from the map. The list starts filtered by the owner: remove that filter if you need to schedule other users’ clients. Until you save, clients appear in yellow with the notice «You have unsaved changes».
- Repeat for the other days. The same client can be on several days, but not twice on the same day.
- If you change the form, use Apply to unpublished. It copies the form, sub-process and service to all of that owner’s pending clients. It does not touch published clients.
- If the period uses Date and time, assign the times (see below). The draft can be saved without times.
- Click Save draft. It saves without creating Tasks and the clients turn blue. You can come back and continue while the period is Open.
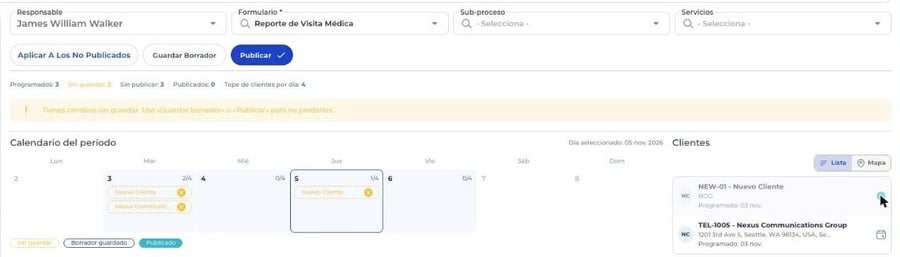
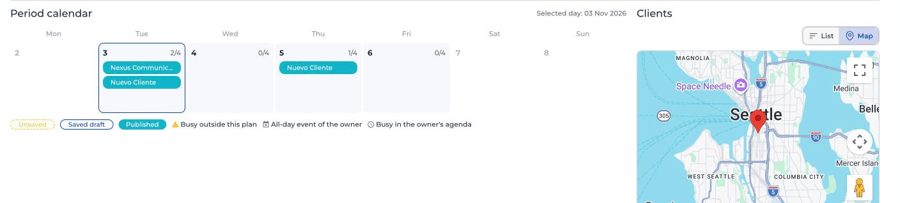
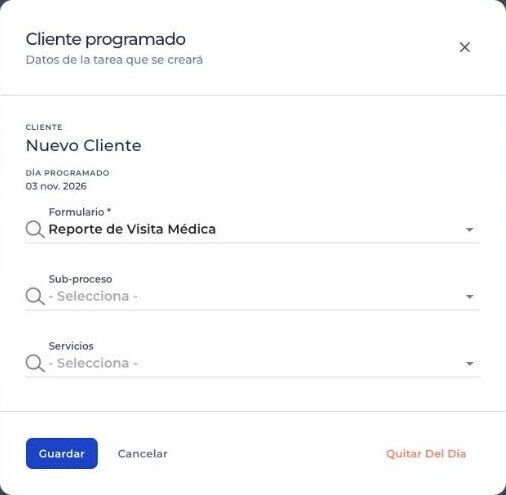
Clicking a client in the calendar opens Scheduled client, where you can change the form, sub-process and service, or remove it from the day.
Busy client
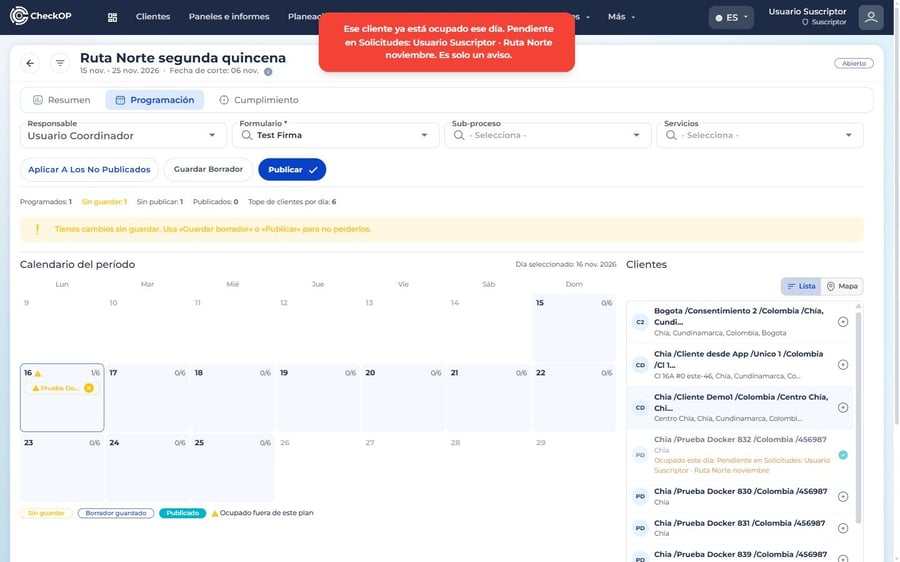
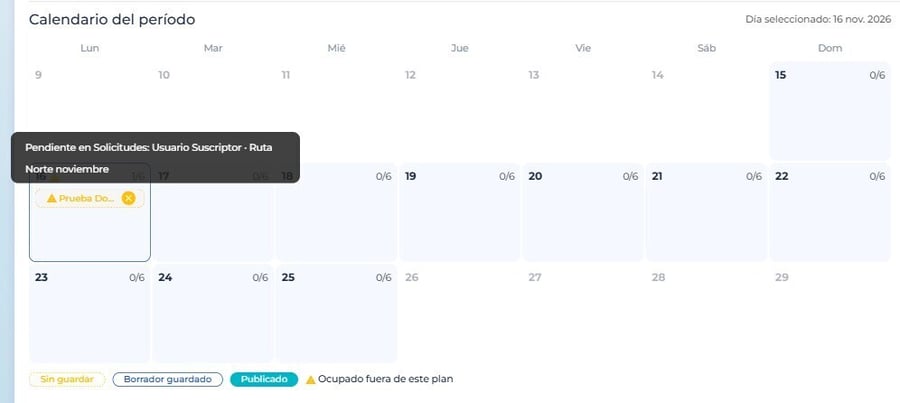
While scheduling, CheckOP warns you if a client is already busy that day outside the plan you are building. The notice does not block: the decision belongs to the planner.
| When it is busy | Notice text |
|---|---|
| It is in another unpublished plan that day: from another owner of the same period or from another open period. | Unpublished plan: person · period |
| It has a pending or in-progress Task that day, from any person or source. | Pending in Tasks: person |
| That pending Task came from another period. | Pending in Tasks: person · period |
Executed Tasks, clients in your own plan and deleted periods do not count. A date-range Task counts as busy on every day in the range. Only saved plans count: if two people schedule at the same time without saving, they do not see each other.
Step by step:
- Select the day in the calendar. In the list, clients busy that day show the line Busy this day.
- If you add it anyway, read the notice with the busy details. The client is added.
- Check the calendar: the client and the day show an alert icon. Hover over the icon to see who is holding it. The legend includes Busy outside this plan.
Who sees the busy details
The notice always says the client is busy and the type of busy. The person and the period only appear if the planner can already see that information elsewhere in CheckOP. Otherwise «another person» appears.
| Busy type | Shown with person and period if |
|---|---|
| Unpublished plan | You have Edit in Planning, or the plan is yours. |
| Pending Task that came from a period | You have Edit in Planning, or you can see that Task in the Tasks module. |
| Regular pending Task | You can see it in the Tasks module: it is yours, you created it, the owner is in a team you lead or you are the account owner user. |

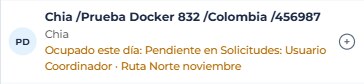
Note: in some screenshots the sample account renamed the Tasks module as «Solicitudes» (Requests). In your account the notice shows the name configured for the module.
If the profile has restricted client reading, the notice only considers own and shared clients, the same as the list.
Owner’s agenda
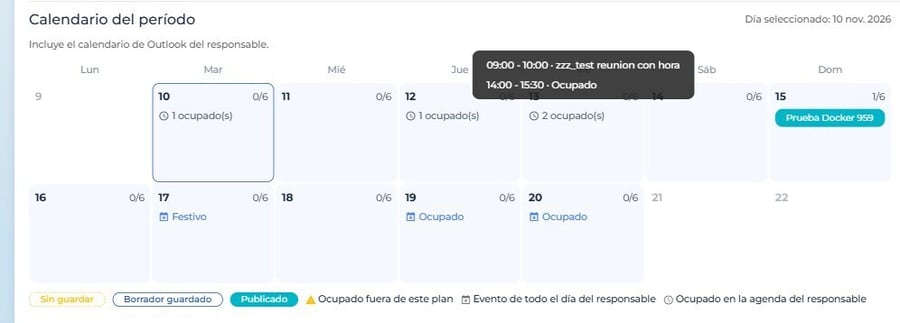
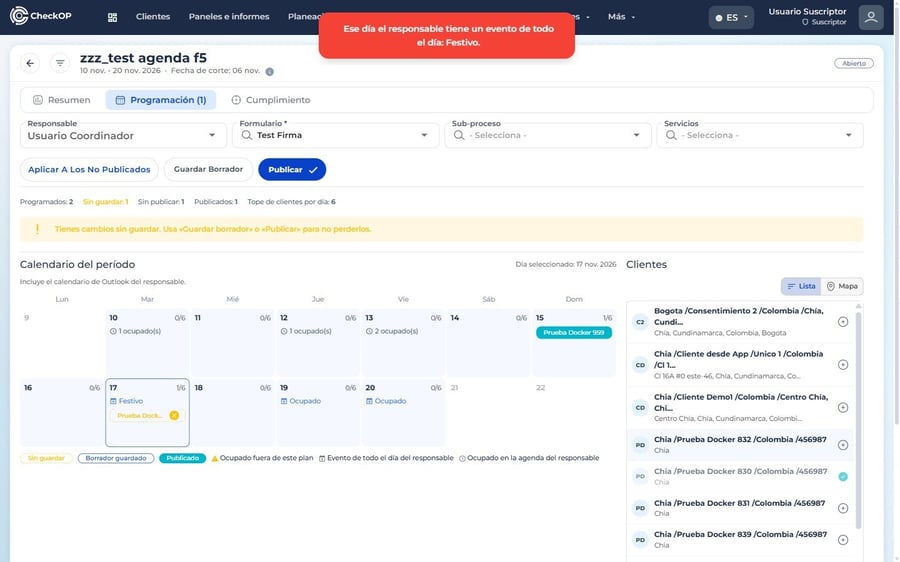
When you choose the owner, the period calendar shows what they already have: their all-day Outlook events (holidays, vacations) and their busy blocks, which are timed Outlook events and pending or in-progress Tasks. Under the calendar title it shows where the agenda comes from: whether it includes their Outlook, whether it is not connected or whether it could not be checked.
| Mark on the day | Meaning |
|---|---|
| Event name with a calendar icon | All-day Outlook event. If it lasts several days, it appears on each one. |
| «N busy» with a clock icon | Busy blocks for that day. Hover to see the details, sorted by time. |
Tasks that came from the same plan do not appear, because they already show in the calendar as published clients. If you add a client on a day with an all-day event, CheckOP warns you and the client is added.
Privacy and requirements
- If you schedule your own plan, you see your Outlook events and your Tasks with their names.
- If you schedule someone else’s plan, their Outlook events appear as Busy, without the subject, and their Tasks show the name only if you can see them in the Tasks module.
- The Outlook agenda only appears if the account has calendar sync turned on and the owner connected their Outlook. Otherwise only CheckOP records are shown.
Schedule with date and time
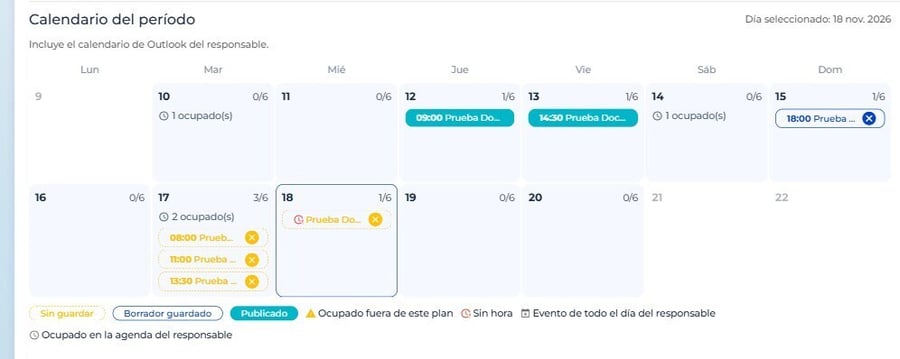
In a period with Scheduling type: Date and time, each client has a time and duration. Clients arrive on the day without a time and with the default duration, marked with the red clock icon No time. Clients that already have a time show it before the name, sorted by time.
Step by step:
- Add clients to the day as usual. They have no time and the period’s default duration.
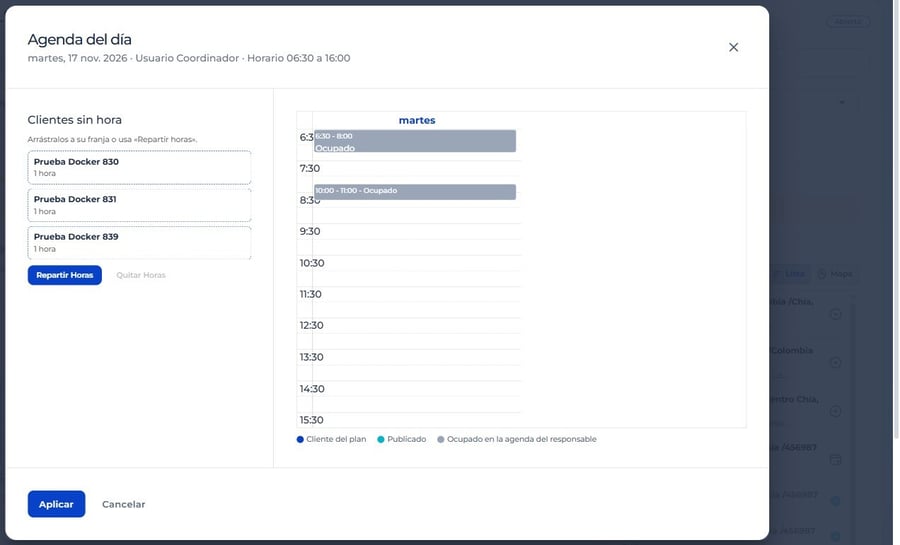
- Select the day and click Assign times. The day agenda opens: clients without a time on the left and the day by hours on the right, with the owner’s busy time in gray.
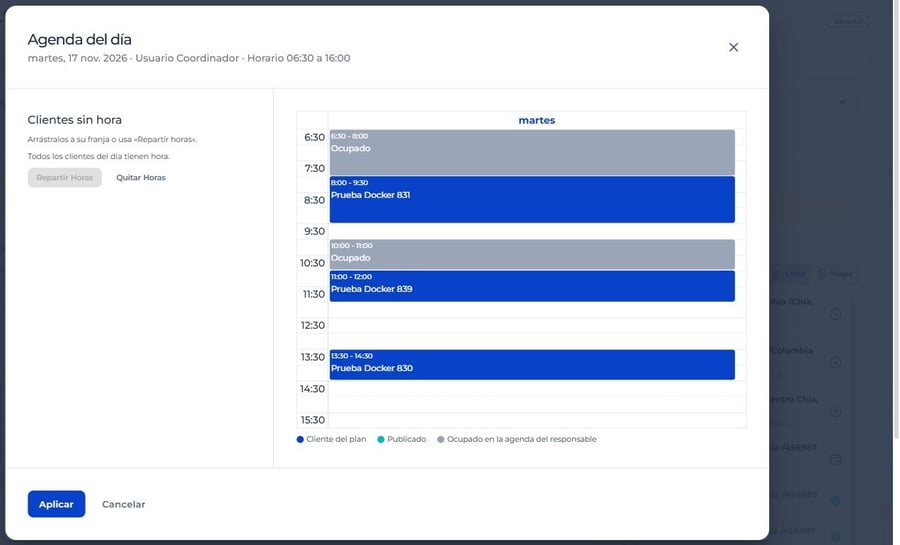
- Arrange the clients. Distribute times places them in order from the start of the working hours, one after another and skipping busy time; those that do not fit before the end stay without a time and the agenda warns you. You can also drag each client to its slot, move it or stretch it to change the duration (from 15 minutes to 12 hours). Clear times removes the time from clients that are not yet published.
- Click Apply and then Save draft. Nothing changes until you apply.
Time and duration can also be changed from the client dialog in the calendar.
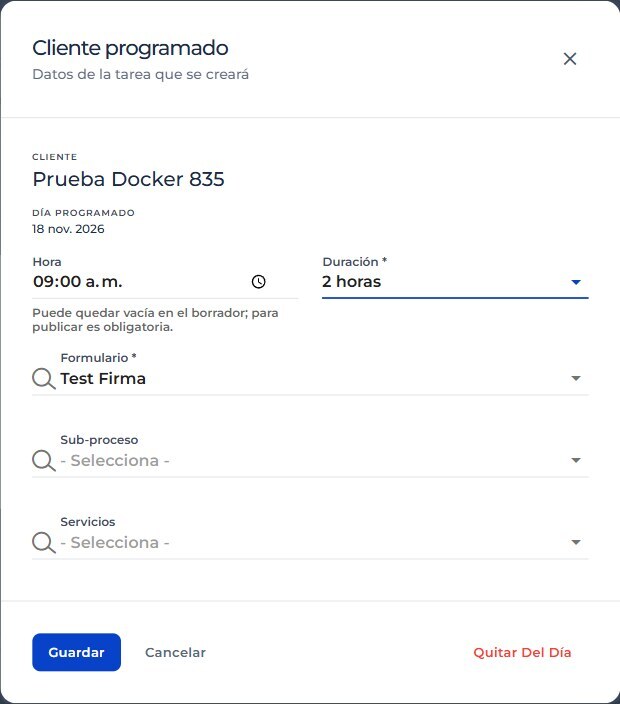
Important: the draft can be saved without times; only publishing requires them. A visit cannot go past midnight. Due date periods work as always.
Scheduling rules
| Situation | What CheckOP does |
|---|---|
| Adding a client without a selected form | Not allowed: «Select a form before adding clients». |
| Adding the same client twice on the same day | Not allowed: «That client is already scheduled for that day». |
| Going over the daily client limit | Warns and lets you continue. |
| Adding a client that is busy that day | Warns with the details and lets you continue. |
| Adding a client on a day with an all-day event | Warns and lets you continue. |
| Publishing with clients without a time in a Date and time period | Not allowed until time and duration are complete. |
| Leaving with unsaved changes | Asks for confirmation before discarding them. |
| Removing a client that is already published | Not allowed: that Task already exists and is managed in the Tasks module. |
| Period In progress or Closed | Shows scheduling as read-only. |
Note: the screenshots in this article show the interface in Spanish.