

Customers and Locations | Client fields
Introduction
In Client fields you define which client data is shown in two places:
- Selectors: the lists where you search for or pick a client, for example when creating a task.
- List card (APP): each card in the client list of the mobile app.
In both cases you can combine native client fields and custom fields, and order them as you like. This helps users identify the right client without opening its record.
Where to set it up
- Go to Administration > Configuration. On smaller screens, Administration appears inside the More menu.
- In the left panel, select Client fields.
- Choose the Selectors or List Card (APP) tab.
The custom fields available in both tabs are the ones you created for Clients in Administration > Dynamic Fields. See Client dynamic fields.
Client fields in selectors
By default, selectors show the client code and name. You can change that text by adding other fields:
- Native fields: code, name, country, state or department, city, address, additional address details, ZIP code and DVP code.
- Client custom fields: up to 3.
Set up the selectors
- In the Selectors tab, open the Add field list and pick a field. Each option shows whether it is Native or Custom.
- Click Add. Repeat for each field.
- Drag fields from the icon on the left to change the order, or remove them with the X.
- In Separator, enter the character that separates the fields. The default is a hyphen.
- Check the Order preview and click Save Changes.
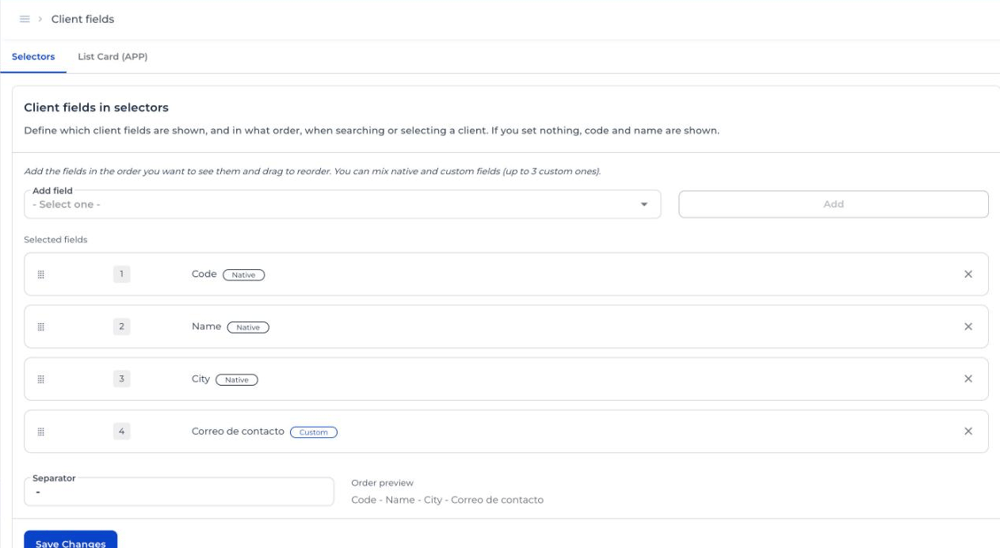
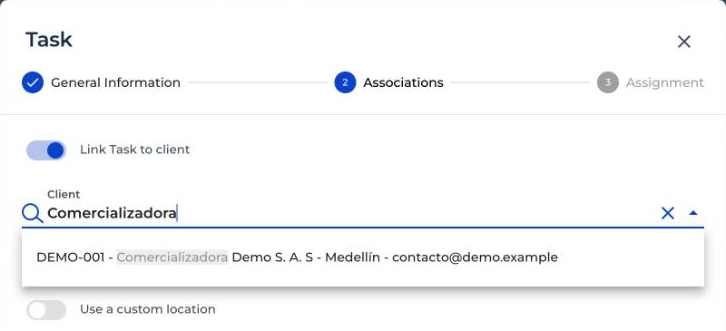
After saving, selectors show the fields in that order. If a client has no value in one of the fields, that data is not shown.
List card fields in the APP
Each card in the client list of the mobile app always shows the client name, code and status. On top of that, you can add up to 6 fields in total, combining native and custom fields:
- Native fields: country, state or department, city, address, additional address details, ZIP code, DVP code, assigned user and assigned user email.
- Client custom fields.
Set up the card
- Open the List Card (APP) tab.
- In Add field, pick a field and click Add. Repeat until you have the fields you need.
- Drag the fields to order them or remove them with the X.
- Click Save Changes.
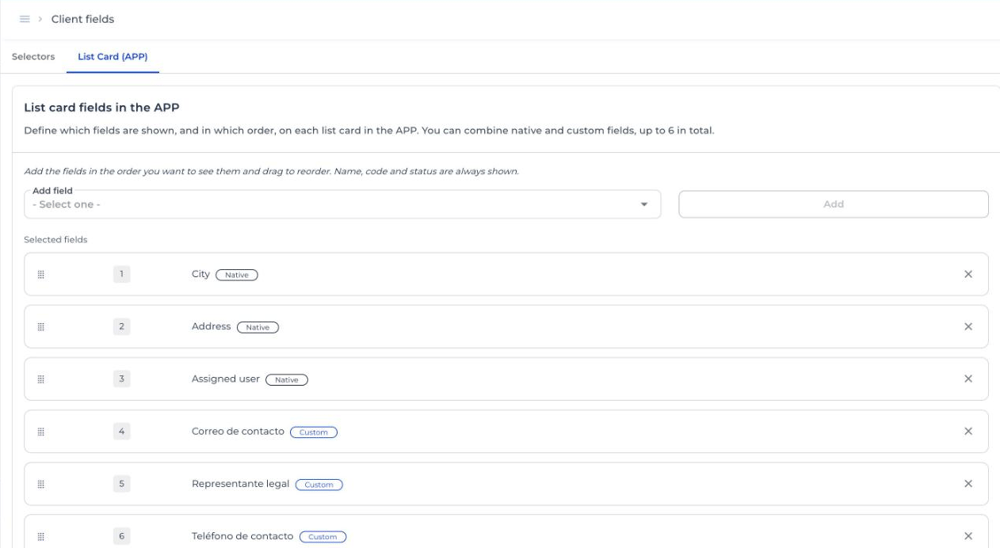
Once you reach 6 fields, CheckOP doesn't let you add more until you remove one from the list.
Recommendations
- In selectors, use fields that tell apart clients with similar names, such as the city or an internal code.
- On the APP card, prioritize the data field users need before opening the record, such as the address or a contact phone.
- Use clear titles for custom fields: that title is what you see when setting them up.
FAQ
Why don't I see custom fields in the Add field list?
Because the account has no custom fields created for Clients. Create them in Administration > Dynamic Fields > Clients.
How many fields can I add to selectors?
You can add the native fields you need and up to 3 custom fields.
How many fields does the APP list card support?
Up to 6 fields in total, native or custom. Name, code and status are always shown and don't count toward that limit.
What happens if I don't set anything?
Selectors show the client code and name, and the APP card shows only the name, code and status.