

Forms | Custom formats
Introduction
Custom formats are templates that turn the information of a task into a PDF document with the layout your company needs: minutes, certificates, records or any document to be signed.
Each format is created inside a form and combines free text with fields that CheckOP replaces with real data when the document is generated: task data, client data and form answers.
New: since the October 28, 2026 release, besides the client's native fields, you can insert the client's custom fields. This way the document can include any data you store in the client record.
Before you start
- Each format belongs to a form and can only be used in tasks of that form.
- For the document to include client data, the task must be related to a client. If you don't see the option to relate the task to a client when creating tasks, turn on Client > Show on the task in the form's Tasks Settings tab.
- To use client custom fields, they must first exist in Administration > Dynamic Fields > Clients. On smaller screens, Administration appears inside the More menu.
Where to set them up
- Go to Operations > Forms.
- On the form card, click the ⋮ menu and select Details.
- Open the Customized Formats tab. It lists the formats created for that form.
- Click + to create a new format, or click the ⋮ menu of an existing format and then Edit.

The format builder
The builder has four parts:
- Format name: required. It is the name you see when generating the PDF.
- Status and Set as default format: enable the format and preselect it.
- HTML editor and Preview: you write and style the document; the preview updates as you edit.
- Fields panel: lists the data you can insert, each with a button to copy its code.
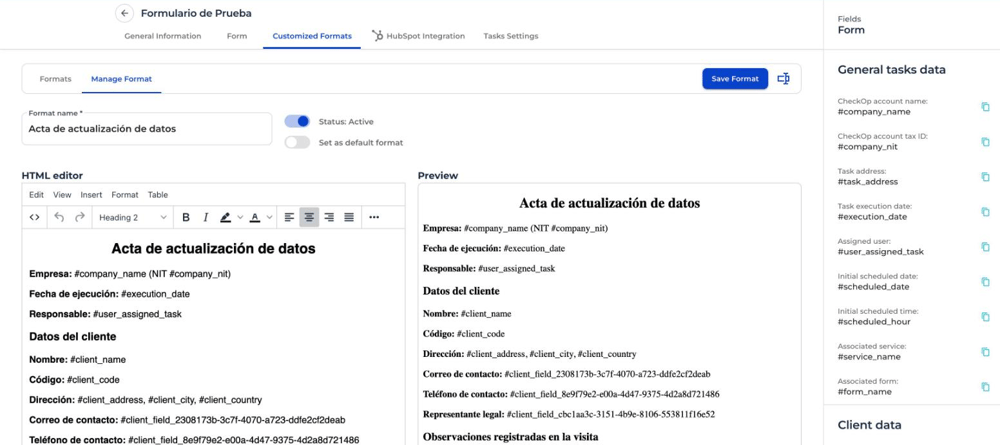
The panel groups the fields as follows:
| Group | What it includes | Code format |
|---|---|---|
| General tasks data | CheckOP account name and tax ID, task address, execution date, assigned user, scheduled date and time, associated service and form. | #execution_date |
| Client data | Native client fields: name, address, code, country, state or department, city, additional address data, ZIP code and DVP code. | #client_name |
| Custom fields (new) | The custom fields created for the Clients module. | #client_field_ followed by the field identifier |
| Form data | The answers to the form fields, grouped by section. | The field identifier, without # |
Important: copy codes with the panel button instead of typing them. Custom fields and form fields use unique identifiers that can't be guessed.
Client custom fields
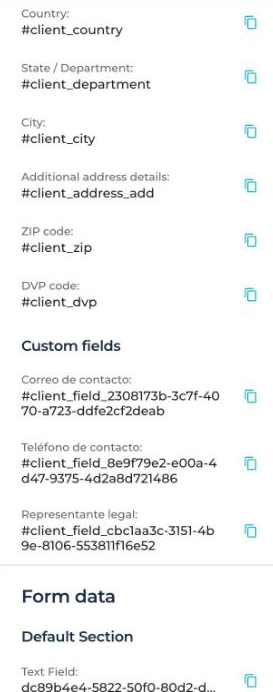
Under Client data you'll find the Custom fields group with every field created for Clients in Dynamic Fields. They are inserted just like a native field and, when the PDF is generated, they take the value stored in the record of the client related to the task.
If the account has no client custom fields yet, this group doesn't appear in the panel.
Step by step: insert a client custom field
- Create the field. Go to Administration > Dynamic Fields, open the ⋮ menu of Clients and select Details. Click Edit, then + Field, choose the type, enter the title and click Save.
- Fill in the value on the client. In Clients, create or edit the client. Custom fields appear at the end of the client form.
- Open the format. In Operations > Forms, go to the form Details, Customized Formats tab, and create or edit the format.
- Copy the code. In the Fields panel, find the Custom fields group and click the copy button next to the field.
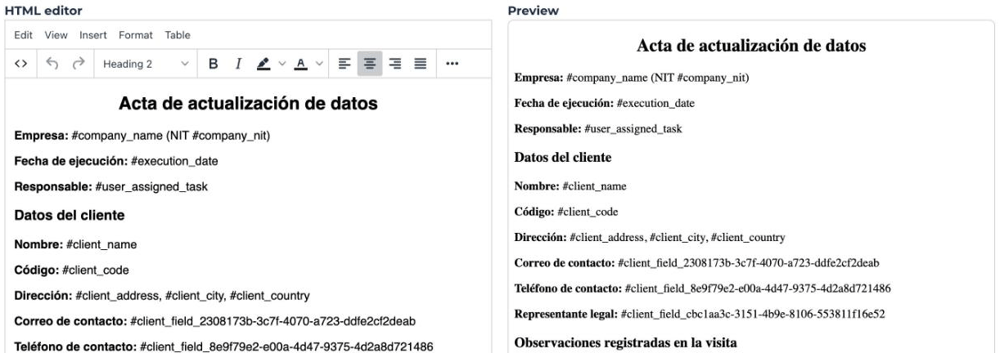
- Paste it in the editor. Place the cursor where you want the data, for example after "Contact email:", and paste the code. The preview shows the code; the real value appears in the PDF.
- Click Save Format.
Generate the document from a task
- Go to Tasks, open the task and, in the ⋮ menu, select Details.
- In the Form responses tab, click Export PDF.
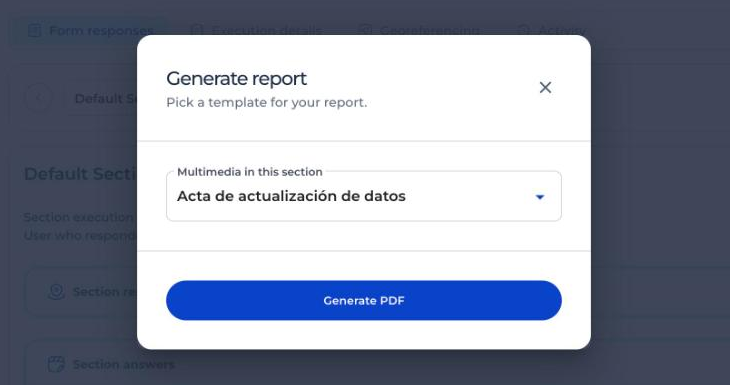
- In the Generate report window, choose the format from the list and click Generate PDF. The document downloads with the task, client and form data.
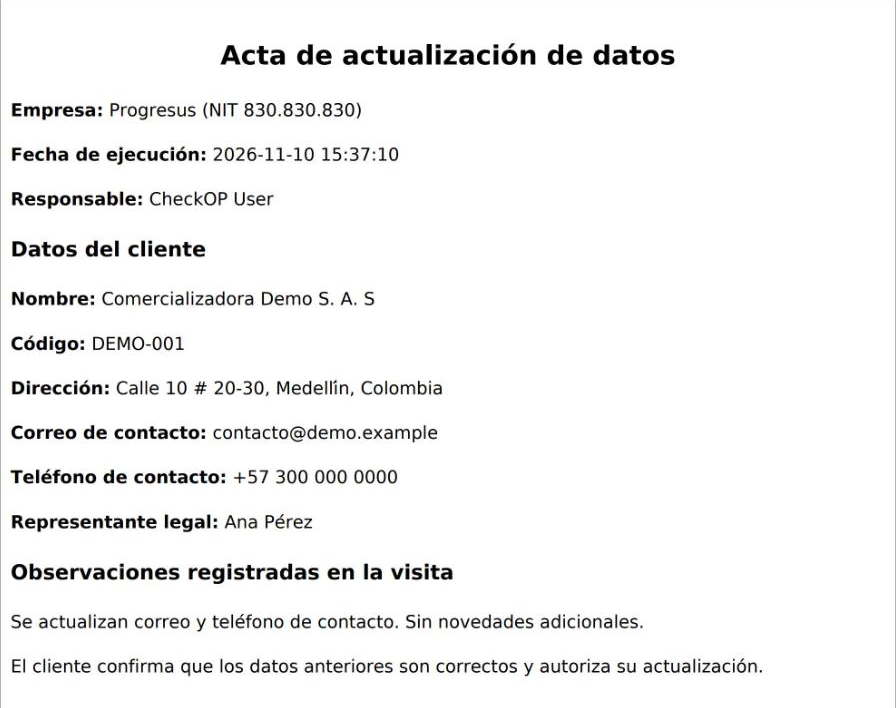
Use case: data update record
A company that visits its clients to confirm their contact details can close each visit with a record. The client record stores three custom fields: Contact email, Contact phone and Legal representative. The visit form has a notes field.
The format combines the four field groups:
Data update record
Company: #company_name (Tax ID #company_nit)
Execution date: #execution_date
Responsible: #user_assigned_task

Client data
Name: #client_name
Code: #client_code
Address: #client_address, #client_city, #client_country
Contact email: #client_field_[identifier]
Contact phone: #client_field_[identifier]
Legal representative: #client_field_[identifier]

Notes recorded during the visit
[notes field identifier]
When the PDF is generated from the task, each code is replaced with the real data: the company name, the date the visit was executed, the client data and what the user entered in the form.
Recommendations
- Use clear titles for custom fields: that title is what you see in the builder panel.
- If the form has several formats, set the most used one as the default format.
- Before using a format with clients, generate a test PDF from a completed task and review the result.
FAQ
Why don't I see the Custom fields group in the panel?
Because the account has no custom fields created for Clients. Create them in Administration > Dynamic Fields > Clients and open the format again.
Why doesn't the PDF include the client data?
Check that the task is related to a client and that the field has a value stored in that client's record.
Can I use custom fields from other modules?
No. The panel includes the custom fields of the Clients module, plus the general task data and the form answers.
Can a form have several formats?
Yes. When generating the PDF you choose which one to use in the Generate report window.