Integrations and Customization | HubSpot | Configuration Guide

About CheckOP

What the App does

CheckOP is a field operations management platform (Field Management Service) that allows you to coordinate, monitor and record field team activities. The integration with HubSpot connects field operations with CRM data, generating full traceability between field activities and customer records in HubSpot.

Main functionalities

  • Bidirectional synchronization: CheckOP tasks and forms are automatically linked to tickets or deals and customers to contacts or companies in HubSpot.

  • Automatic reporting: Operational reports with attachments (PDFs, images) are published as notes in HubSpot

  • Status update: Changes in CheckOP are reflected in the configured pipeline stages

  • Georeferencing: GPS location record of each customer, synchronizable as custom properties

  • Assignment of responsible parties: CheckOP users are associated with owners in HubSpot

Benefits of integration

  • 360° customer view combining commercial and operational data

  • Real-time automation without manual updates

  • Full traceability for audits and follow-up

  • Scalability according to each company's operational structure

Installation

Prerequisites

Before installing the CheckOP app, make sure you meet the following requirements:

  1. Active HubSpot account.

    • You must have a HubSpot account with Super Admin or Connected App Manager permissions.

    • The app is compatible with the following editions:

      • HubSpot Service Hub

      • HubSpot Sales Hub

      • ( Professional or Enterprise versions recommended).

  2. Active CheckOP account

    • A CheckOP account with Administrator role or permissions is required to set up integrations.

    • The integration uses authentication credentials generated from the CheckOP environment.

  3. Stable Internet connection

    • Synchronization between CheckOP and HubSpot is performed in real time or under scheduled tasks, so it is necessary to ensure stable connectivity during initial setup.

  4. Modules enabled in CheckOP

    • It is necessary to have the Forms and Tasks module active, since they are the ones that allow sending structured information to HubSpot.

    • The GPS Tracking module is optional, but allows you to enable geo-referenced logging of executions.

  5. Customer data correctly structured in HubSpot

    • To take advantage of the geo-referencing features, the address, city and country fields of contacts or companies in HubSpot must be complete.

    • This information will be used by CheckOP to calculate latitude and longitude coordinates, which can be synchronized as custom properties.

Module location

  1. Log on to https://app.checkop.co.
  2. In the top menu, select:
    Administration → Settings → HubSpot.
  3. In the side menu, select:
    HubSpot.

Within the settings panel, the sections are displayed:

  • Global Settings
    • Global Integration Settings
      • Activation
  • Logs
01. Installation module location

Integration activation

In the Activation block, do the following:

  1. Check the "Activate integration" checkbox.
    • Status: ✅ Active.
    • Visible description:

"Enable or disable all HubSpot integrations, this action applies to customers, tasks and property sync."

  1. This action allows CheckOP to initiate automatic connection processes with HubSpot and enable internal endpoints to synchronize data.

HubSpot Application Type

  • In the HubSpot App Type block, there are two options:

    • Private App.
    • Public App (selected by default in the current configuration).

    Selecting Public App indicates that authentication is done via OAuth 2.0, using a HubSpot authorization flow.

Installing the HubSpot Public App

    1. Locate the "Install App" button , which links to HubSpot's OAuth flow.
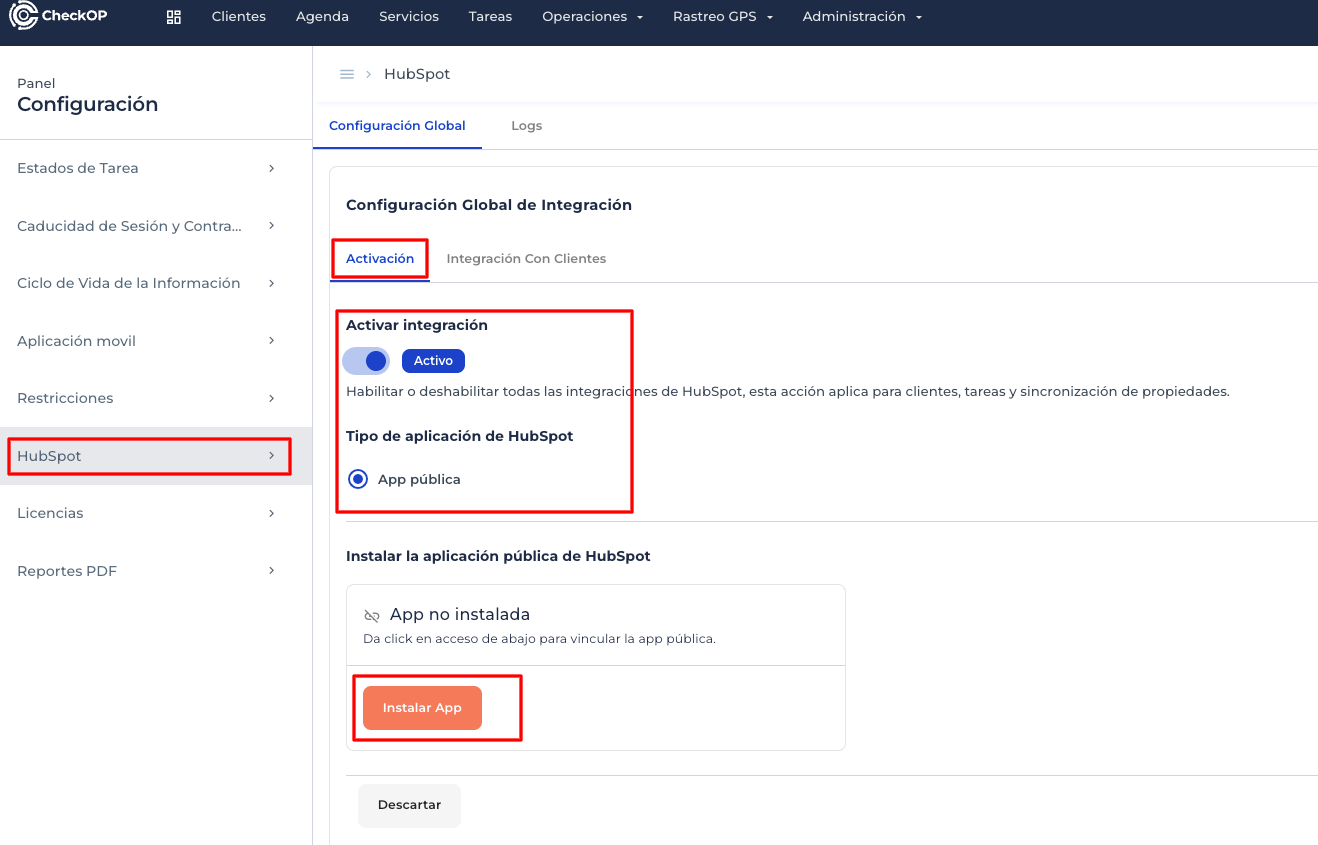
Install app button

Clicking "Install App":

    • HubSpot portal opens to choose a target account or portal.
choose hubspot account
    • The user must be logged in to HubSpot (if not already logged in).
    • The CheckOP permissions authorization window is displayed.
authorize permits
  • Click on "Connect application".


This automatically redirects back to CheckOP.

  • After connecting the app in HubSpot and the redirect is activated click "Link account".
link account
  • Finally click on "Confirm".
confirm link
  • You will now be able to "Start configuration".
start configuration

Expected result:

  • Installation status changes to "Connected".

app conectada

Scopes requested by CheckOP

The application requests permissions ("scopes") that allow full interaction with CRM and objects:

Category

Requested scopes

Contacts

crm.objects.contacts.read, crm.objects.contacts.write, crm.schemas.contacts.read, crm.schemas.contacts.write

Companies

crm.objects.companies.read, crm.objects.companies.write, crm.schemas.companies.read, crm.schemas.companies.write

Businesses and Orders

crm.objects.deals.read, crm.objects.deals.write, crm.pipelines.orders.read, crm.pipelines.orders.write

Custom Properties

crm.schemas.custom.read, crm.objects.custom.read, crm.objects.custom.write

Tickets and Files

tickets, files

General Authentication

oauth

These permissions ensure the bi-directional communication necessary to synchronize client, task, property and pipeline data.

Connection validation

After completing the installation:

  1. Return to Settings → HubSpot.
  2. Confirm that:
    • The status shows "Active".
    • The error message "Invalid login data" is not displayed .
    • The "Install App" button changes to a visual confirmation status or stops displaying.

Final recommendations

  • Keep the Enable integration checkbox active.
  • If you change the HubSpot portal or OAuth access expires, repeat the installation process.
  • Do not share tokens or OAuth links outside of the secure CheckOP environment.

Configuration | Customer Integration with HubSpot

Target

Enable the correct configuration of the data exchange between CheckOP and HubSpot, establishing how customer properties in both systems are related(mapping) bidirectionally and which records will be considered for synchronization from HubSpot to CheckOP(constraints).

Access to the module

  • In the top menu, select:
    Administration → Settings → HubSpot.
  • In the side menu, select:
    HubSpot.
  • Inside the configuration panel, the sections are displayed:
    • Global Settings
      • Global Integration Settings
        • Activation
        • "Customer Integration".
    • Logs
access to customer integration module

Activate synchronization

  1. Check the box ✅ Enable client synchronization.
  2. In the "Integrate CheckOP customers with HubSpot object" field , select the corresponding object:
    • Contacts
    • or Companies
activate sync clients

Note: This defines with which object type the information synchronization will be performed.

Customer property mapping

The Customer Property Mapping section allows you to link internal CheckOP fields to existing or new HubSpot properties.
Below, a table with all the mapping columns is shown

How to perform the mapping

  • In the HubSpot Property (API) column click on the editable field.
  • You can:
    • Select an existing property
      • Use the search engine that displays all available properties of the object (e.g. city, address, industry, etc.).
      • Choose the correct property according to the CheckOP field.

    • Create a new property directly from CheckOP
      • Click on "Create property".
      • Fill in the fields:
        • Group: (e.g. Contact Info).
        • Display name: "DVP Code".
      • Click Create now to create the property in HubSpot and link it automatically.

    • Accept the automatic suggestion
      • If CheckOP detects a match (e.g. "City" → city), you can keep it or modify it.

  • Repeat this process for each row in the table.
  • Press Save settings when you are done.

Note: Fields with "Default" mapping are already linked to native HubSpot properties, so they do not require modification.

Client synchronization restrictions

Target

Define conditions to limit which records are fetched from HubSpot to CheckOP, based on specific values in configured object properties (e.g. contacts).

This allows CheckOP to only fetch records that meet the defined criteria, avoiding synchronizing unnecessary information.

How to add a restriction

  • In the Restrictions block, click Add Restriction.
add customer restriction
  • A panel with two main fields will open:
    • Select a property
      • Displays the complete list of properties available in HubSpot (according to the object).
      • Example: addresstype, country, industry, lifecyclestage, etc.
      • In the current view it is shown for example:

address (Street Address) - contactinformation

    • Restriction value(s)
      • Enter the exact value(s) that this property must have to be synchronized.
      • Each value must be the internal value of the field in HubSpot (not the visible label).
      • Press Enter to add multiple tag values.
      • Example:
        • Property: typeaddress
        • Values: bo_BillTo, bo_ShipTo
  • Click on Save.

guardar restriccion
The constraint will be added to the Constraint List.

list of restrictions

Below the list the buttons appear:

  • Save settings (Clients) → apply the restriction.
  • Discard → cancel the changes.

Operation of restrictions

During each synchronization process:

  1. CheckOP queries the objects configured in HubSpot (Contacts or Companies).
  2. Before importing the data, it applies the conditions defined in the Restrictions block.
  3. Only records that meet all the configured conditionsare retrieved.
  4. Records that do not meet the conditions are ignored (not brought into CheckOP).

💡 Illustrative example according to configuration:

  • Property: typeaddress
  • Values: bo_BillTo, bo_ShipTo
    🔁 Only HubSpot contacts whose typaddress field contains one of these values are synchronized to CheckOP.
    Other contacts will not be fetched during synchronization.

Editing or deleting

Each existing restriction can be:

  • Edit to modify the property or allowed values.
  • Delete to remove the filter.

Technical considerations

  • Properties must exist in HubSpot with their valid internal name.
  • The values must match exactly (case sensitive).
  • If there are multiple constraints, CheckOP combines them with a logical AND operator.
  • These conditions only affect the fetching of data from HubSpot, not the sending.

Good practices

  • Use HubSpot properties with well-standardized values (e.g., bo_BillTo, bo_ShipTo).
  • Do not use visible tags as constraint values; always use the internal value of the field.
  • If you want to synchronize multiple customer types, add the values as separate tags.
  • Document internally the properties and conditions used to maintain traceability.

Expected result

  • CheckOP customer fields are correctly mapped to HubSpot properties and will work the synchronization bi-directionally.
  • If constraints are configured, during synchronization, CheckOP only fetches records from HubSpot that meet the defined constraint conditions.
  • A controlled, efficient and aligned integration with business criteria is maintained.

Usage: Client Synchronization

Customer synchronization allows contact and company information to be kept up to date between CheckOP and HubSpot in both directions.

From HubSpot to CheckOP

How it works:

  1. Initial Import: When sync is enabled, CheckOP fetches all contacts or companies from HubSpot that meet the configured restrictions (if any).
  2. Continuous automatic sync: Every time a contact/company is created or updated in HubSpot:
  • CheckOP detects the change automatically via webhooks.
  • Creates or updates the corresponding client in CheckOP
  • Mapped fields are synchronized according to the set configuration
  • If restrictions are active, only records that meet the conditions are synchronized

Practical example:

Case: New customer registration from the sales team in HubSpot.

  1. The sales team in HubSpot creates a new contact "Maria Lopez" with complete data: address, phone, email, city.
  2. CheckOP detects the creation of the contact automatically (less than 5 seconds).
  3. The customer "Maria Lopez" appears in CheckOP with all mapped fields synchronized.
  4. Field users can now search for this customer and assign tasks or forms to it from the mobile app.

Synchronization frequency:

  • Immediately when creating/updating a record (via HubSpot webhooks).
  • Scheduled hourly sync as a backup (in case webhooks fail)

Restrictions in action:

If you configured restrictions (for example: only contacts with address_type = "bo_BillTo"):

  • Only HubSpot contacts that meet this condition are imported to CheckOP.
  • Other contacts are ignored and do not appear in CheckOP.
  • Useful for filtering only active customers, customers from a specific region, or any business criteria

From CheckOP to HubSpot

How it works:

  1. Creating customers in CheckOP:
    • If you create a new customer directly in CheckOP, the corresponding contact or company is automatically created in HubSpot
    • The configured property mapping is applied
    • HubSpot ID is stored in CheckOP for future synchronizations
    • The customer is linked between both platforms

  1. Existing customers are updated:
    • Any changes to a customer's mapped fields in CheckOP are automatically reflected in HubSpot
    • Synchronization respects the address configured on each property
    • Non-mapped fields are not affected

Practical example:

Case: Field data update by operational user.

  1. A field technician visits the customer "Maria Lopez" and detects that the registered phone number is incorrect.
  2. From the CheckOP mobile app, the technician updates the customer's phone number.
  3. Upon saving, CheckOP automatically syncs the change to HubSpot (less than 3 seconds).
  4. The contact in HubSpot now reflects the correct phone number.
  5. Change history is recorded on both platforms with date, time and user.

Synchronization frequency:

  • Real-time: when saving the customer in CheckOP.

Bidirectional Synchronization and Conflict Resolution

Integration maintains consistency in both directions simultaneously:

HubSpot (Contacts/Companies) ←→ CheckOP (Customers).

Conflict resolution:

  • If a record is modified simultaneously on both platforms, the last received update (per timestamp) prevails.
  • Unmapped fields are not affected by synchronization
  • Each platform maintains its data integrity

Constraint behavior:

  • From HubSpot to CheckOP: Constraints work as input filter (only those that meet the condition are imported).
  • From CheckOP to HubSpot: Constraints do NOT apply (all customers created in CheckOP are sent to HubSpot).
  • This allows the field team to register new customers with no operational restrictions.

Important note: The restrictions are designed to control WHAT data comes in from HubSpot to CheckOP, not to validate WHAT data goes out of CheckOP to HubSpot.

Configuration | CheckOP Forms Integration with HubSpot

Target

Allow each form created in CheckOP to integrate with HubSpot by linking the records created (form responses via task assignment in CheckOP) to a CRM object with pipeline, such as Tickets or Business, and automatically define to which pipeline and stage the submitted data and task status from CheckOP should be assigned.

Access to the module

  1. In the top menu, select:
    Operations → Forms.
  2. Create a new form or choose an existing one and click on "Details".
form module access
  • Go to the HubSpot Integration tab.
  • Turn on the "HubSpot form integration" switch .
  • The configuration sections divided into blocks will be displayed:
    • General Settings
    • Base property mapping
    • Form properties mapping
    • Advanced settings
HubSpot Integration Form

General configuration of the form

Within General Settings, the target object and synchronization rules are defined.

Main fields:

Field

Description

Active

Enables or disables the integration of the form with HubSpot.

Target Object

Defines the type of CRM entity where form submissions will be registered (e.g. Tickets or Deals).

Pipeline

Allows to select the pipeline within the chosen object. This pipeline represents the CheckOP task stage/state where the new records will be placed.

Pipeline stages

The CheckOP process states and their correspondence with the pipeline stages in HubSpot are configured.

Selection of the target object

When activating the integration, the user can choose between:

  • Tickets (Service Hub).
    Ideal for support forms, incidents, PQRS or maintenance.
  • Deals (Sales Hub)
    Suitable for commercial or business opportunity forms.

The Target Object field is populated with the object name in HubSpot, for example:

  • Tickets
  • or Deals

Pipeline configuration and creation of new pipelines

In the Pipeline field, the user can:

  • Select an existing pipeline synchronized from HubSpot (for example: CheckOP).
  • Or, create a new pipeline directly from CheckOP without leaving this interface.

Create a new pipeline from CheckOP.

  • Click on Add new Pipeline at the bottom of the drop-down list.
  • A modal window will open where you can define:
    • Name of the new pipeline.
    • Pipeline stages, each with its name and order.

Crear Pipeline

  • Save the changes by clicking "Create Now" and CheckOP will send this configuration to HubSpot via the corresponding API, creating the pipeline and its stages.
  • Once created, the pipeline will be available in the selection field to associate with the current form.

💡 Example:
If the form belongs to the Tickets object, you will be able to create a "Preventive Maintenance" pipeline with stages such as:

  • Received
  • In review
  • Completed

CheckOP state mapping ↔ HubSpot stages.

Once the pipeline has been chosen, the table of correspondence between CheckOP's internal states and the stages of the pipeline in HubSpot is displayed.

Pipeline Correspondence Table

Each row allows you to choose, via a drop-down field, the stage of the HubSpot pipeline that corresponds to each CheckOP operational status.
This ensures a dynamic synchronization of the progress of tasks or forms.

Additional configurations

additional configurations form hubspot sync
  • Relationship with HubSpot notes

Allows CheckOP to send status updates and reports in PDF format as attached notes within the object record in HubSpot.
This is configured using a relationship identifier type:

227 - (Native) - HubSpot_DEFINED

  • Relationship with assigned users

If assigned users in CheckOP also exist as owners in HubSpot:

    • Activate the option "Relate assigned task users to owner users in HubSpot".
    • The user field must be mapped to the HubSpot_owner_id property .

  • Relationship with customers

If customer integration is active, you can relate each form submission to a specific HubSpot contact.
The customer field in CheckOP must be mapped to HubSpot_client_id.

Complete functional flow

Stage

Action

Result

1

User completes and submits the form in CheckOP.

A record is created (task or form executed).

2

CheckOP evaluates the integration configuration

Identifies the target object, pipeline and configured stage.

3

A new record is generated in HubSpot

A ticket or deal is created according to the defined object.

4

The record is associated to the selected or created pipeline.

It is placed in the stage corresponding to the CheckOP status.

5

If the notes option is active

PDF or status updates are sent as notes in HubSpot.

6

If there is a relationship with users or customers

The corresponding IDs(HubSpot_owner_id, HubSpot_client_id) are linked.

Actual configuration example

Form: "HubSpot Sync Test Form".
Target object: Tickets
Pipeline: CheckOP Test
Status mapping:

  • Pending → Pending
  • In progress → In progress
  • Completed → Finished
    Active relationships:
  • Assigned users ↔ HubSpot owners ✅
  • Customers ↔ HubSpot contacts ✅
  • Notes with PDF report ✅

Expected result:
Each form submission generates a ticket in HubSpot within the "CheckOP Test" pipeline, automatically synchronizing the operational status according to the flow in CheckOP.

Final result

  • CheckOP forms can be associated with any HubSpot pipeline or a new one can be created.
  • CheckOP statuses are directly reflected in pipeline stages.
  • The integration maintains a consistent relationship between customers, owners and updates.
  • Pipelines created from CheckOP are immediately synchronized in HubSpot without requiring additional steps.

Mapping of Task Base Properties associated to Form

Target

Configure the base properties of the tasks associated to the forms integrated with HubSpot in CheckOP, allowing to define the correspondence between the internal fields of assigned tasks associated to the forms and the properties of the selected HubSpot object (e.g. Tickets or Deals).

Section location

The section is located inside the form, under the tab:

HubSpot Integration → Base Property Mapping.

General Description

This setting allows you to establish the direct link between native or calculated CheckOP fields and the properties (API) of the target object in HubSpot.
The mapping defines what data will be sent or updated in HubSpot when a task or form is executed from CheckOP.

Section structure

At the top is the text:

"These are the base properties that CheckOp uses to manage the creation and update of the tasks themselves. Map each property to an existing property in HubSpot or create a new one if needed."

Below are the following items:

  • Search field:
    "Search property - allows you to filter existing properties by API name or tag.
  • Mapping table, with columns:

Column

Description

Status

Shows whether the property has already been mapped or is pending mapping, as well as whether it is a required property from HubSpot.

CheckOP Field

Technical name of the internal field. Example: "Internal Identifier (Calculated CheckOp)", "Customer", "Task Name", etc.

Type

Data type of the field (text, date, number, select, booleancheckbox, etc.).

HubSpot Property (API)

Editable field where the equivalent property in HubSpot is selected, searched or created.

Assignment

Indicates if the property was assigned manually or is predefined as default.

Configuration flow

Step 1. Search for existing property

Each row allows you to type or search for a HubSpot property in the "HubSpot Property (API)" field.
The system displays automatic matches based on the available properties in the configured object(Tickets, Deals, etc.).

Example:

  • If you type "customer", the system may suggest: HubSpot_client_id
  • If you type "owner", it may suggest: HubSpot_owner_id

Step 2. Select matching or suggested property

When there is a match, CheckOP displays the suggestion with the text:

"Suggested property: [API_name]."

The user can:

  • Select the suggested property directly.
  • Or leave the field empty if he does not want to map that property yet.

In some cases, the text "Unmapped - Property Required" appears below the field to indicate that it is mandatory before saving.

If a suitable HubSpot property does not exist, it is possible to create it directly from this field.

  • In the drop-down, when typing the name of the desired property, the option "Create property" will appear .
  • When selected, CheckOP will create the corresponding property in HubSpot using the API, respecting the data type and group of the target object.

  • Automatically, this new property will be associated to the CheckOP field.

Note: This avoids leaving the CheckOP environment to manage properties in HubSpot, facilitating a direct integration from the mapping.

Step 4. Save configuration

Once you have configured the required properties, click on:

Save property settings.

The system validates that the mandatory properties have a valid value.
If any required property is not mapped, the message is displayed:

"Unmapped - Required Property".

Only after resolving those mappings the save is confirmed with the message:

"Configuration saved successfully."

System messages or labels

The following auxiliary texts may be displayed during configuration:

  • "Unmapped - Property required" → indicates that the property is mandatory before saving.
  • "Suggested property: [API_name]" → displays a recommendation based on name or type matching.
  • "Calculated Property (Read Only)" → some properties cannot be modified because they are automatically generated from CheckOP.

Technical considerations

  • Calculated CheckOP properties (e.g., latitude, longitude, or timestamps) should not be manually edited in HubSpot.
  • If a property is deleted or renamed in HubSpot, it must be reconfigured in this table before synchronizing.
  • Properties created from CheckOP retain the internal (API) name to maintain forward compatibility.
  • HubSpot read-only properties will not be available for mapping as write target (avoids READ_ONLY_VALUE type errors).

Expected result

Once the mapping is complete:

  • All form base properties are associated with valid HubSpot object properties.
  • CheckOP can create or update records in HubSpot with the defined values.
  • Validation messages disappear and the system confirms "Configuration saved successfully."

Form Properties Mapping

Target

This setting allows the fields created in the CheckOP form (those captured by the user in the field from app or web) to be synchronized with custom properties in HubSpot, within the selected object(Tickets or Deals).

From this section, the user can:

  1. Choose or create the group of properties where the form fields will be stored.
  2. Automatically create the corresponding properties in HubSpot, respecting data types and options.
  3. Execute the synchronization action, which creates or updates those properties within the CRM.

Section location

Accessed from the tab:

HubSpot Integration → Property Mapping Form.

It appears after the "Base property mapping" block.

General Purpose

This section is used to map CheckOP custom form fields to properties in HubSpot, ensuring that the information that users fill out in the field (e.g. responses, photos, selections, notes, etc.) is available within the CRM under the linked object (such as Ticket or Deal).

Main interface elements

Property group

Field:

Group
[text input with search engine and creation option].

Allows you to select or create the HubSpot property group within the current object (e.g. "contactinformation" or "ticket_information") where the new properties generated from the form fields will be stored.

The group defines the "folder" or "category" where HubSpot will organize those custom properties.

💡 Practical example:

    • Target object: Tickets
    • Property group: checkop_form_data
      → All properties created by this form will be grouped there.

Available buttons:

    • Save group → Saves the selected or created target group.
    • Cancel → Undo changes without saving.

Manual synchronization

Information text on the screen:

"This action will synchronize CheckOp fields with HubSpot properties automatically. A property will be created in HubSpot for each form field that does not already have a property set. It will also update multiple option properties with the options currently set on the form."

Functional flow of mapping and synchronization

Step 1. Select the property group

Before creating or synchronizing properties, you need to define in which HubSpot group they will be saved.

  1. In the "Group" field, search for an existing group or type a new name.
  2. If it does not exist, CheckOP will allow you to create it directly from this interface.
  3. Click on Save group.

This group is linked to the target object configured in the form (e.g. Tickets or Deals).

If the form synchronizes with Tickets, the properties will be created in the chosen group within that object.

Step 2. Compatibility check

Once the group is defined, CheckOP analyzes the form fields and their types (text, number, dropdown list, checkbox, date, etc.) to determine which ones can become HubSpot properties.

  • If a property with the same name and type already exists, CheckOP detects and reuses it.
  • If it does not exist, CheckOP will automatically create it during synchronization.

Step 3. Create or update properties

By pressing the "Synchronize" button , CheckOP executes a one-way synchronization:

🔁 F rom CheckOP to HubSpot.
(Never in reverse direction).

During this action:

  • A property is created in HubSpot for each form field that does not yet have a match.
  • Existing multiple type properties (dropdown lists, multiple select or checkbox) are updated, aligning the currently configured options on the form.
  • Field names and types are kept synchronized, avoiding inconsistencies between both systems.

Important: This synchronization does not import properties from HubSpot to CheckOP.
The recommended direction is CheckOP → HubSpot to maintain integrity and consistency.

Step 4. Subsequent adjustments

If the form is modified (for example, a field is added or deleted, or the options of a list are changed):

  1. Save the form.
  2. Return to the HubSpot Integration tab.
  3. Click "Synchronize" again for the changes to be reflected in HubSpot.

Operational tip: Each time a form is edited in CheckOP that has active integration, a subsequent manual sync should be run to update the properties and options in HubSpot.

Compatibility considerations

Field type in CheckOP

Property created in HubSpot

Behavior

Text or number

Property of type text or number

Created or updated with the same type.

Date

Property of type date

Created or updated with the same type.

Single selection or drop-down list

Property of type enumeration

The options are updated automatically according to the options in the form.

Multiple selection or checkbox

Property of type checkbox group

CheckOP updates all current form options.

Multimedia field (photos, videos, documents)

Property of type text (URL)

Saves the URL to access the file in CheckOP.

Good practices and warnings

  • ✅ Always sync after editing the form.

  • ⚙️ Do not manually create properties in HubSpot with the same name; CheckOP manages them automatically.

  • 🚫 Do not modify in HubSpot the data type of a property created by CheckOP (may cause write errors).

  • 📡 Maintaining one-way synchronization(CheckOP → HubSpot) ensures that lists, options and formats remain consistent.

  • 🔁 If a form needs to be restructured, simply re-synchronize: CheckOP will adjust or recreate the necessary properties.

Expected result

By completing these steps:

  • All form properties in CheckOP will have equivalents in HubSpot.
  • The properties will be organized within the selected group.
  • Subsequent changes to the form (new fields or options) can be easily replicated with the "Synchronize" button.
  • The data relationship will be kept up to date and conflict-free between the two systems.

HubSpot Options by Field - CheckOP Form Editor

Target

Documenting the functionality that is enabled within the form editing mode once the form property synchronization with HubSpot has been executed.
From this point on, each form field (created with the "Drag & Drop" visual editor) incorporates an option called "HubSpot Options", which allows you to review and manage the HubSpot property associated with that field.

Necessary background

For this option to be available, the following steps must be completed in order:

  1. Activate the HubSpot integration from the "HubSpot Integration" tab.
  2. Select the target object (Tickets or Deals).
  3. Define or create the property group where the form fields will be stored.
  4. Execute the synchronization with the "Synchronize" button in the Form Properties Mapping section.

When the synchronization is executed, CheckOP automatically creates in HubSpot a property for each form field (if it did not already exist), assigning it a unique internal name starting with the prefix checkop_.

Form editing mode

Once synchronized, by pressing the Edit button at the top of the form tab, CheckOP enters the Drag & Drop editing mode.

In this mode you can:

  • Add, move or delete fields.
  • Edit the titles, types and restrictions of each field.
  • And most importantly: access the HubSpot Options for each field.

Location of the "HubSpot Options" option

Each form field has a small button visible with the text HubSpot Options.

This button is located next to other controls such as:

  • More Restrictions
  • Remove field

Clicking on HubSpot Options opens a modal box that displays field-specific integration information.

Content of the "HubSpot Options" modal

Within this modal window is displayed:

Field

Description

HubSpot Property

Text field containing the internal name (API Name) of the property in HubSpot associated to the current field. Ejemplo: checkop_9826c654b3265536b8b762065d144a36.

Action buttons

Apply - Saves the changes if the user edits the property name.

Cancel - Closes without modifying the assignment.</li></ul>.

Important note: This internal name (checkop_...) is automatically generated by CheckOP during synchronization and is unique for each field.

Technical performance

  • When you create a new field in the form, CheckOP internally generates an identifier.
  • When the synchronization with HubSpot is executed, that field becomes an actual property in the CRM, linked to the selected property group.
  • The system stores in each CheckOP field the direct reference to the internal name of the newly created property.

Thus:

  • If a user opens HubSpot Options, they will see the value of the name field (API) of the HubSpot property reflected.

Modify the property from the editor

Although the system allows you to manually modify the property name (API Name) within the "Property in HubSpot" field, this should only be done if you have full technical knowledge of the existing properties in HubSpot.

Warning: Manually changing this value to a non-existent or incompatible name may cause synchronization errors or loss of data correspondence.

For this reason, it is recommended to follow this official operating rule:

CheckOP Recommendation:
Do not manually modify the property name in this field.
Let CheckOP automatically create and manage the properties using the "Synchronize" button , ensuring full compatibility of types and options.

Actual example

Suppose the form has the following fields:

  • Text field: HubSpot Test Form 1
  • CheckBox: HubSpot Test 2
  • Photo field: HubSpot Test Form photos

After synchronizing, when opening HubSpot Options in each:

Field

Property generated in HubSpot

HubSpot Test Form 1

checkop_9826c654b3265536b8b762065d144a36

HubSpot Test Form 2

checkop_7f3215b9d4f3a971a8b7cfb8132417af

HubSpot Form test photos

checkop_a0efbda7f4b145c098b12f71b98722a9

Each one points to a different property created in HubSpot within the group configured in the integration.

Relationship to the synchronization process

If the form is modified - for example, option labels are changed or new fields are added - the correct process is:

  1. Save the form changes.
  2. Go to the HubSpot Integration → Form Properties Mapping tab.
  3. Press Synchronize.

This ensures that:

  • New properties are created for new fields.
  • Multiple selection or drop-down list field options are updated.
  • Properties are still correctly linked to the correct field, retaining internal names.

Good operating practices

Recommendation

Description

Avoid manually editing internal names

Let CheckOP handle the creation and naming of properties.

Always synchronize after structural changes

Each time a field is added, modified or deleted, sync again.

Maintain consistency from CheckOP to HubSpot

The integration is designed as a one-way flow (CheckOP → HubSpot) to prevent data conflicts.

Verify compatibility before mapping to existing properties.

If you need to connect to an existing HubSpot property, make sure the data type is exactly the same.

Expected result

Once the synchronization has been executed and the properties have been configured:

  • Each form field has a valid property associated with it in HubSpot.
  • The HubSpot Options button allows you to verify and, if necessary, manually edit the API reference.
  • CheckOP maintains a clear and direct relationship between your form and the CRM, ensuring that the data entered is correctly synchronized.

Advanced Configuration - CheckOP Forms Integration with HubSpot

Target

Define the advanced settings available in the integration of a CheckOP form with HubSpot, related to the synchronization of subtasks, the management of multimedia files and the security of public links.

These options allow you to fine-tune the integration behavior for cases where forms have associated subtasks, multimedia content or PDF reports.

Section location

Within the form, access:

HubSpot Integration → Advanced Settings

Section Overview

This tab contains additional settings that control how CheckOP sends more complex information (subtasks, files, reports) to HubSpot, including security and visibility parameters.

The interface displays the following configuration blocks:

Logical configuration of subtasks

Option 1:

Task subtasks associated with this form will travel as separate records to the integration.

Functional Description:

  • When this option is enabled, each subtask associated with a main task in CheckOP is recorded in HubSpot as a separate record within the same configured object (e.g. Ticket or Deal).
  • This allows HubSpot to manage the subtasks with their own information, properties and status.

Technical behavior:

  • Each subtask adopts the same property mapping scheme as the main form.
  • CheckOP sends the subtasks using the same synchronization flow.

Recommendation: Keep this option active when subtasks need to be analyzed independently in HubSpot (e.g. for reports or specific execution dashboards).

Option 2:

Pull PDF reports from subtasks to their parent record in HubSpot.

Functional description:

  • If this option is active, the PDF reports of the subtasks are attached directly to the parent record (the parent task) within HubSpot.

Technical behavior:

  • Subtask records continue to exist in CheckOP, but their visual documentation is centralized in HubSpot to simplify management.

Recommendation: Enable this option if the customer uses HubSpot primarily for executive management or general tracking and requires pdf files/reports of subtasks in the parent record.

Public multimedia links

Option 3:

Generate display links to fields with multimedia.

Functional description:

  • Triggers the automatic generation of public and secure URLs for all multimedia fields (images, documents, videos, etc.) uploaded to the form.
  • These URLs are included in the records sent to HubSpot, so that the files can be referenced directly from the CRM.

Technical behavior:

  • CheckOP converts files uploaded to the form into links stored in its storage service.
  • Links are associated with the corresponding field property in HubSpot.
  • Links are public for reading only; they do not allow editing or deletion from HubSpot.

⚙️ Example:
If a form field allows uploading inspection photos, after syncing, the direct link to the file will be displayed in HubSpot.

Option 4: Media link display password.

Field:

🔒 Multimedia link display password.
[Input of type password]

Functional description:
Allows to set a password to restrict the viewing of multimedia files shared via public links generated by CheckOP.

Technical behavior:

  • If a password is defined, multimedia links will include an additional security layer requiring prior authentication.
  • This password is global for all links generated from the current form.
  • It can be changed at any time from this section.

Important: If the password is changed, the previously generated links will still be valid, but will require the new password.

Action buttons

Button

Function

Save advanced settings

Saves all current section settings. The message "Configuration saved successfully" appears.

Cancel

Discards the changes made and keeps the previous settings.

General recommendations

Situation

Recommendation

Forms with operational or hierarchical subtasks

Keep the option "Will travel as independent records" activated.

Forms with many visual or document subtasks

Activate the option "Carry PDF reports of the subtasks to the parent record".

Forms with evidence or multimedia files

Keep "Generate display links for fields with multimedia" active.

Forms with sensitive or private information

Define a "Display password" to restrict access to links.

Structural modifications or field type changes

Re-run form synchronization with HubSpot.

Expected result

Upon completion of this configuration:

  • Subtasks are correctly synchronized with HubSpot according to the selected logic.
  • Media files and reports are published as secure links in the corresponding properties.
  • Parent and child records maintain integrity and traceability.
  • Public links respect password-defined access settings.

Usage: Synchronization of Tasks and Forms

The synchronization of tasks and forms connects field operations with CRM records, creating tickets or deals in HubSpot with all the information captured in the field.

Complete Operating Cash Flow

Step 1: Task assignment in CheckOP

  • A supervisor or coordinator assigns a form task to a field user.
  • The task must be linked to a customer (which must previously exist in HubSpot or CheckOP)
  • CheckOP automatically validates that the form has active integration with HubSpot
  • If the form does not have integration configured, the task is created normally but is not synchronized

Step 2: Field execution

  • The user receives notification of the task in his CheckOP mobile app
  • Accesses the assigned form (can work offline if necessary)
  • Completes all form fields:
  • Captures photos, videos or documents
  • Records customer's digital signature
  • Captures GPS location automatically
  • Fill in text fields, numbers, selection lists, etc.
  • Add additional remarks or notes
  • When finished, mark the task as completed
  • If offline, data is stored locally and synchronized when connection is regained

Step 3: Automatic synchronization to HubSpot

Immediately after completing the task, CheckOP automatically executes the following actions:

  1. Creates a new record on the configured object (Ticket or Deal) within the HubSpot portal.
  2. Places the record at the stage of the pipeline corresponding to the current status of the task in CheckOP
  3. Maps all the base properties of the task:
    • Task Name
    • Description
    • Date created
    • Completion date
    • Current status
    • Assigned user
    • CheckOP Unique Identifier

  1. Synchronizes the values of each form field to its custom properties in HubSpot:
    • Text Fields → Text Properties
    • Numbers → Numeric properties
    • Dates → Date properties
    • Selection lists → Enumeration properties
    • Checkboxes → Multiple selection properties
    • Media files → File access URLs → File access URLs
  1. Associates the record with the corresponding contact or company in HubSpot.
  2. If configured, assigns the owner in HubSpot according to the user assigned in CheckOP
  3. Generates public links for all captured media files:
  • Applies security password if configured
  • Links are available in the corresponding properties
  • Allows direct access to photos, videos, PDFs, signatures, etc.
  1. Attach the complete PDF report as a note in the HubSpot record:
  • PDF includes all information from the form
  • Is added to the registration timeline
  • Becomes available for download from HubSpot

Step 4: Status updates

If the status of the task subsequently changes in CheckOP (e.g., from "In Progress" to "Completed", or from "Completed" to "Validated"):

  • The record in HubSpot is automatically moved to the corresponding stage of the pipeline.
  • A note is recorded in the timeline with the status change, timestamp and the user who made the change.
  • If subtasks are configured, they are also updated according to the set advanced settings
  • State synchronization is unidirectional: CheckOP → HubSpot (manual stage changes in HubSpot do NOT affect the state in CheckOP)

Manual Actions in CheckOP

Although the synchronization is automatic, there are manual actions you can perform when necessary

Force re-synchronization of a specific client

  • Situation: You detect that a customer's data is out of date or the synchronization failed.
  • Steps:
    • Go to the customer's file in CheckOP
    • Edit some data and/or Click on the "Save" button.
    • The system will force a synchronization.
    • Result: The data is updated in both directions.

Review Synchronization History (Logs)

  • Situation: You need to audit synchronizations, detect errors or verify what was synchronized.
  • Steps:
    • Go to Settings → HubSpot → Logs.
    • View the complete log of all synchronizations.
    • Filter by date, process or status (success/error).
    • Identify rejected or failed logs to correct them
    • Result: Full visibility of all sync operations.

Re-synchronize form properties

  • Situation: You added or modified fields in a form and need to update the properties in HubSpot.
  • Steps:
    • Edit the form in CheckOP and add/modify the necessary fields.
    • Save the form
    • Go to the "HubSpot Integration" tab of the form
    • In the "Form properties mapping" section, click on "Synchronize".
    • CheckOP automatically creates the new properties in HubSpot
  • Result: The form properties are now perfectly synchronized with HubSpot.
Important: You must do this EVERY TIME you modify the form structure.

Force re-synchronization of a pending or in-progress task

-Situation: You detect that a task in CheckOP shows a synchronization error with HubSpot and was not submitted correctly.

- Steps:

  1. Go to the task listing in CheckOP and locate the task that appears with the message "HubSpot sync error".

  2. Click "Retry" (yellow circular icon).

  3. The system will try again to send the task information to HubSpot.

-Expected result: the task successfully re-syncs with HubSpot within a few seconds and the error status disappears.

- If it fails again:

  • Review the updated error message, as it usually indicates the specific reason for the failure.

  • Based on that reason, go to the form settings associated with the task.

  • Verify:

    • That all required fields are correctly mapped to HubSpot properties.

    • That the form configuration is complete and there are no missing required values or data mappings.

-End result: Once the mappings or settings are adjusted, use "Retry" again , and the task should sync without any problems.

Force re-synchronization of completed tasks

-Situation: You notice that one or more tasks in Completed status did not sync correctly with HubSpot and have submission errors.

- Steps:

  1. Go to the Tasks module and open the Completed tab.

  2. Click on the "Synchronize" button located at the top right.

  3. A message will appear stating:

  4. Select Confirm to continue or Decline if you need to review the errors before retrying.

-Expected Result: Completed tasks that had sync errors will retry sending to HubSpot.

If the sync fails again

  • Go into the detail of the task that failed to sync.

  • Review the exact reason for the error listed there.

    • Go to the form settings associated with that task.

    • Verify that all fields are mapped correctly with HubSpot properties.

    • Make sure there are no missing mandatory properties or required values.

      Depending on the message:

  • Once corrected, use the "Synchronize" button again to retry.

Manual Actions in HubSpot

Maintain customer data

  • Situation: You need to correct or update contact or company information from HubSpot.
  • Steps:
    • Edit the contact or company normally in HubSpot
    • Modify the fields you need
    • Save the changes
  • Result: Changes are automatically reflected in CheckOP (immediate webhook)
  • No additional actions required

Change ticket/deal stage manually

  • Situation: You need to move a record between pipeline stages for management reasons in HubSpot.
  • Steps:
    • Open the Ticket or Deal in HubSpot
    • Drag the record to another stage of the pipeline
  • Result: The change is reflected in HubSpot but is NOT synchronized back to CheckOP.
  • Important: The status synchronization is unidirectional (CheckOP → HubSpot).
  • If you change the state in CheckOP, it will overwrite the manual HubSpot change.

Review multimedia evidence

  • Situation: You need to access photos, videos or attachments from HubSpot.
  • Steps:
    • Open the synced Ticket or Deal from CheckOP.
    • Find the custom properties that contain links to files
    • Click on the corresponding link
    • If there is a password set, enter it in the popup window
  • Result: The files open in a CheckOP viewing window.
  • You can download or share them as needed

Mandatory setting when using custom properties instead of suggested properties

When, in the integration between CheckOP and HubSpot, the default suggested properties are not used and instead custom properties are created to map customer, task or form information, additional manual configuration is required in HubSpot.

This is because custom properties do not automatically notify CheckOP when they are modified, so synchronization would not be able to run correctly without this setting.

The following are the actions that need to be performed:

1. Create the technical property flag_checkop in HubSpot

This property allows HubSpot to alert CheckOP each time a property mapped with a custom property is edited.

Mandatory characteristics:

  • Internal Name: flag_checkop

  • Type:Date and time picker

  • Object: The same object where the mapping is being performed (e.g. Contacts, Business, Tickets or any object involved).

Steps:

  1. Go to Configuration > Objects > [Involved object] > Manage properties.

  2. Click on Create property.

  3. Assign the internal name flag_checkop and select the Date and time type.

  4. Save the property.

2. Create a Workflow to detect changes in custom properties.

This workflow will take care of updating the flag_checkop property every time any of the mapped properties change, allowing CheckOP to detect that it must synchronize that data again.

Steps:

  1. Create a workflow from scratch.

  2. Name it, for example: "CheckOP Flag - [Object]".

    • Select Data values → Property value changed.

    • Choose the option "Multiple property values were fulfilled".

    • Select the corresponding object (e.g. Contacts).

    • Add all custom properties you want to monitor.

    • For each property select the "Is a known value" condition .

    • Use OR logic to combine multiple properties.

    • Activate Allow re-registration for all added properties.

      Configure the trigger:

  3. Save the trigger.

3. Configure the Workflow action

  1. Add an action within the workflow.
  2. Select CRM → Edit record.
  3. Choose the flag_checkop property.
  4. Under Choose value, select "Use the date the action was completed".
  5. Save the action.

4. Publish Workflow

  • Click on Review and publish.
  • Check the option:
    • "Do not enroll records that already meet the conditions".
  • Publish the workflow.

Why is this process mandatory?

  • Properties suggested by CheckOP are now ready to notify changes.

  • Custom properties do not send activity notifications by default.

  • If this flag(flag_checkop) + workflow is not set, CheckOP will not know when to sync manually modified data to HubSpot.

  • The result would be sync failures, outdated data or errors in the integration.

Final result

With this additional configuration:

  • Whenever custom properties linked to the mapping are modified,

  • HubSpot will automatically update flag_checkop,

  • And CheckOP will be able to detect the change and execute the correct synchronization of the logs.

Additional manual action: Users / Owners correspondence

In order for CheckOP to correctly synchronize customer and task owners to HubSpot, there needs to be a direct correspondence between the users of both platforms. This is especially important when using the HubSpot property HubSpot_owner_id to define the owner of the generated ticket, deal or task.

Key Considerations:

  • Users assigned in CheckOP must also exist in HubSpot.

  • Both must have the same email address in order to establish owner matching.

  • If a user exists in CheckOP but does not exist in HubSpot, and an attempt is made to synchronize a task assigned to that user, HubSpot will return an error.

  • This happens because HubSpot will not find a valid owner to associate the record generated from CheckOP.

How to avoid this problem:

  1. Make sure you create the same users in CheckOP and HubSpot (same email = same identity).

  2. If you do not want to rely onHubSpot_owner_id, you can use in CheckOP a custom property to define another owner logic. That custom property should be configured and mapped consistently across integrations.

End result:

With properly synced owners across platforms, completed tasks will be sent to HubSpot without errors related to user mapping.

Disconnect integration

Steps

  1. Go to Settings → HubSpot
  2. Disable Enable integrations
  3. Save changes

What happens to the data

  • No data is deleted in HubSpot.
  • It simply stops all synchronization.
  • Objects already created remain intact.
  • If you then reconnect:
    • Mappings still exist.
    • Unsynchronized records are NOT synchronized retroactively.
    • Forms may generate errors if properties change.

Uninstall the application

Steps


HubSpot Official Reference

From HubSpot:

  1. In your HubSpot account, click theSettings iconSettings in the top navigation bar. In the left sidebar menu, go toIntegrations > Connected Apps.
  2. ClickActions on the app you want to disconnect, and then clickUninstall.
  3. In the dialog box, type"uninstall" in the text field and clickUninstall.

Data implications

  • No tickets or created objects are deleted.
  • Custom properties are not deleted.
  • Multimedia and sent notes are not deleted.
  • Tasks in CheckOP will continue to run but will not send or receive information.

On this page